Narrowboat AC Electrical systems.
We used to get called in to cure all sorts of installation problems on narrowboats. Often the installation started as one system, then over the years had been the recipient of so many changes and modifications that the final system was often very complicated to operate, unreliable and in many cases downright dangerous.
There really is no need for this if a logical approach is taken to the installation.
This page is not intended as a concise education in AC electrical installations. That would require an entire book. It is intended as a starting point in order to allow the various options to be considered. Until further notice it should be considered as a work in progress and will be added to periodically.
If you have a particularly unique system please tell us about it. If we consider it of wider appeal we would love to include it within these pages.
This first system usually consists of nothing more than a shorepower facility. Even this can be installed incorrectly. There are 4 main points that must be adhered to.
1. Despite what some people think (they are wrong), the AC ground must be bonded to the hull. See here for an explanation of why.
2. The installation must include one or more RCDs that protect all circuits.
3. The cabling must be protected by the correct size fuses or circuit breakers.
4. All components used must be of the correct type, i.e. correct ratings and manufactured specifically for use with 230 volt systems.
So, that having been said let's look at the most basic system. A shorepower plug (yes it is indeed a plug not a socket) feeding the boat AC system.
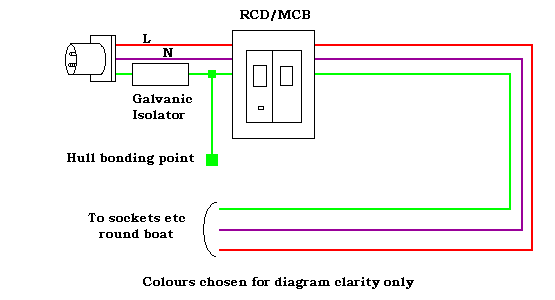
Note the electrical position of the galvanic isolator and the earth/hull bonding. Anywhere else is wrong.
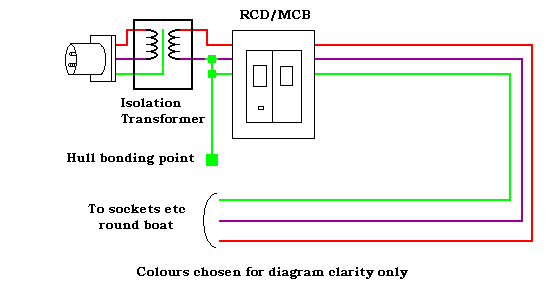
Here is exactly the same system but using an isolation transformer instead of a galvanic isolator.
Another possible installation uses just an inverter with no facility for shorepower. Let's now take a look at this installation. This same installation is also applicable to a generator instead of an inverter.
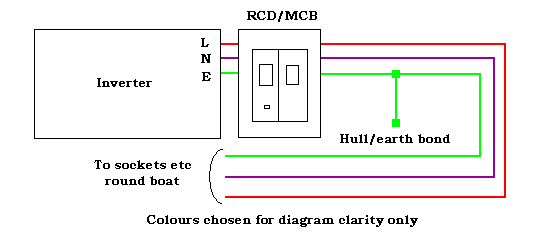
Note that no galvanic isolator is required in this case.
Often it is desirable to have an inverter for use when away from the mooring and also shorepower for use when in the marina. This then complicates matters in that some means to switch between the two is required.
There are probably more ways to achieve this than there ways to skin a cat. The most basic method is to have a plug feeding the boat electrical system which is simply plugged into shorepower or the inverter. This is far from ideal. Usually a more permanent solution is sought.
One possible problem that has to be guarded against is any possibility of shorepower finding it's way to the output of the inverter. This would, in nearly all cases, totally destroy the inverter, instantly, whether or not it is switched on. Partly for this reason both the Live and the Neutral have to be switched. Also "break before make" switches must be used.
Here is one way of switching between shorepower and inverter.
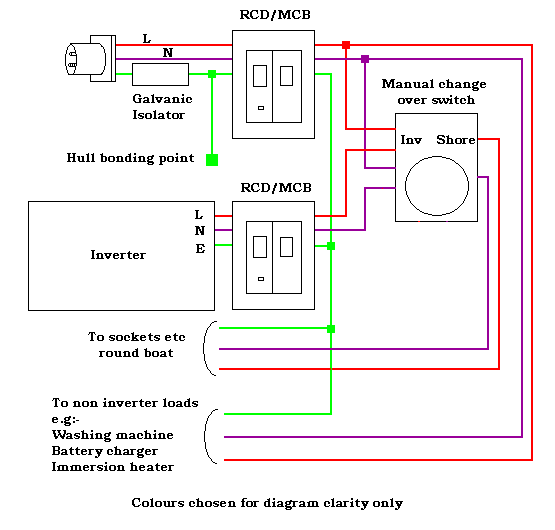
And here is exactly the same system but using an isolation transformer instead of a galvanic isolator.
This method uses a manual change-over switch to select between shorepower or inverter. It is simple and reliable. The only downside is that it requires user intervention to select between the two. This does not bother many people.
Note that in this diagram there is also a separate feed for running equipment that would, if run from the inverter, quickly flatten the batteries. This feed only receives power from the shore-line. It cannot be powered by the inverter. Obviously a battery charger would be connected to this feed.
Note that as a result of having 2 separate circuits (one for loads that may run from the inverter and a separate one that only runs from shoreline), it is necessary to install 2 RCDs.
RCDs are quite expensive, so another way of achieving the same result (i.e. having a separate circuit fed by shoreline only) is to use a 4 pole switch, which only connects certain loads when in the position for shoreline. Here is the diagram for such a system. Thanks to John Gwalter for this idea. Whilst this idea is simple, we were very impressed with it. It shows great ingenuity.
And, again, here is the same system using an isolation transformer instead of a galvanic isolator.
In the two systems shown directly above the shoreline and inverter both feed into the manual changeover switch in the usual manner. The output from the changeover switch then feeds into a single RCD and on to the rest of the boat. The output from the RCD also feeds back to the other two sets of contacts in the switch so that the final power feed is only "live" when the switch is in the "shorepower" position.
This has the advantage that only one RCD is required. The downside is that a more expensive switch is needed and the wiring is slightly more complicated.
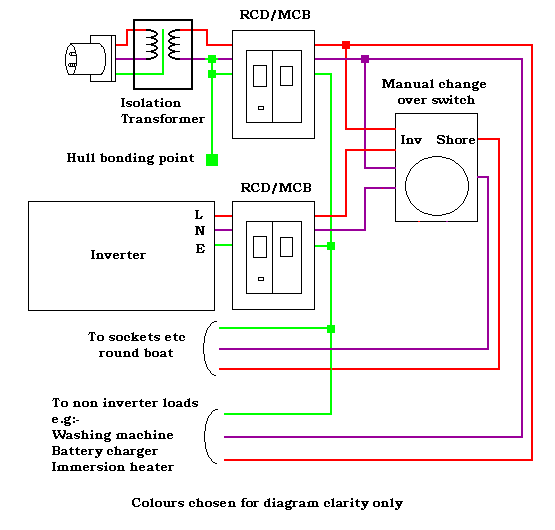
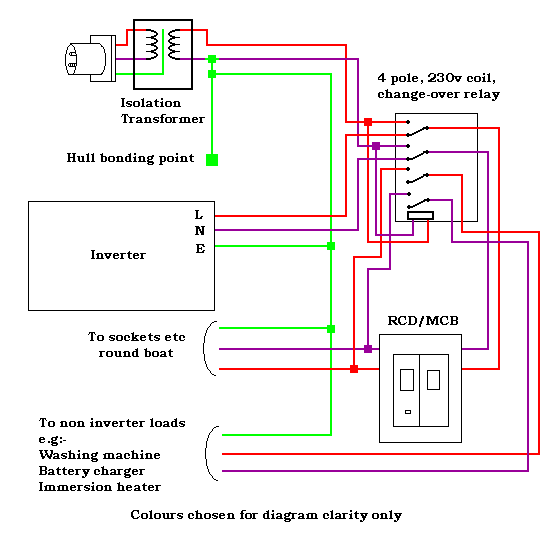
For many people, the manual changeover switch is an inconvenience. The job can be automated with the use of a relay having a 230 volt coil. Here is the diagram for such a system. It is essentially the same as the first manual system above. It also uses 2 RCDs for full safety protection.
And, again, with an isolation transformer instead of a galvanic isloator.
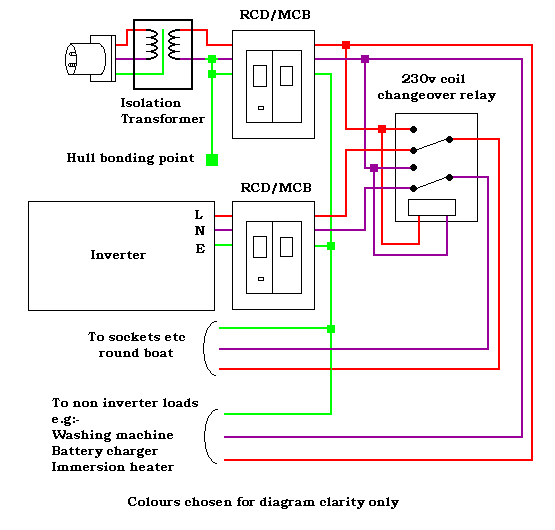
Note that, as is usual practice, the relay is shown with the contacts in the resting position.
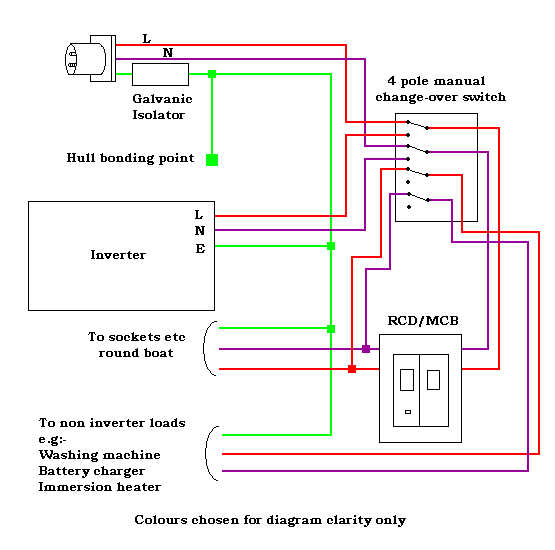
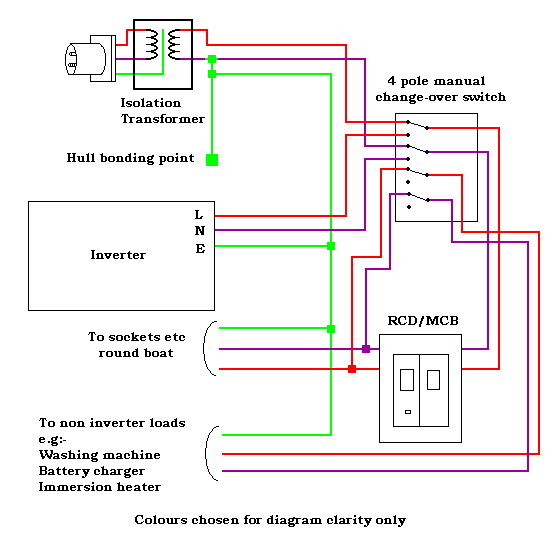
And in the same way that the manual system can be modified to use a single RCD by using a 4 pole switch, the automatic system can also be modified thus.
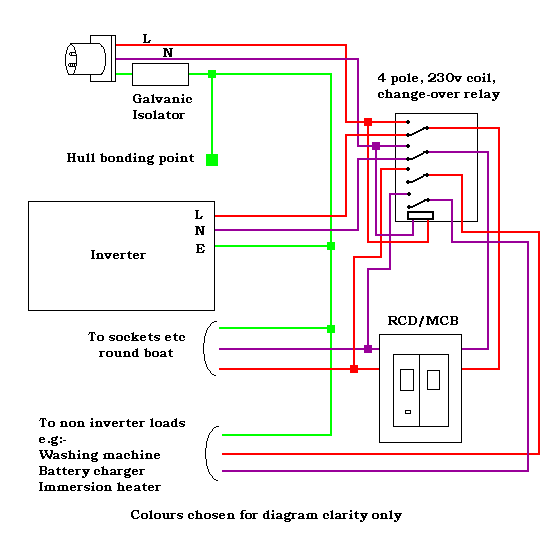
And the same again, but with an isolation transformer instead of a galvanic isolator.
This is effectively the same as the single RCD manual changeover system but automated with the use of a relay.
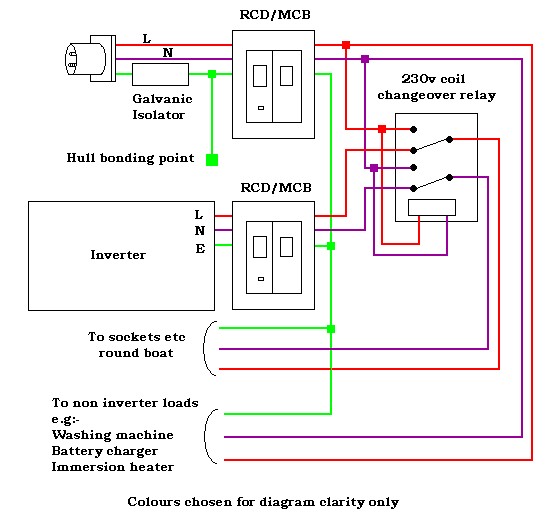
The diagrams above are in no way exhaustive. There are many other ways of achieving the same result. But often they are overcomplicated and achieve nothing more than those above.
The diagrams shown here can be expanded. For instance an installation may also have a generator. The usual practice would then be to use another changeover switch (either manual or automatic) to select between shorepower or generator, then the second switch selects between this or the inverter. Many other options are possible. But the systems shown above are a good starting point.
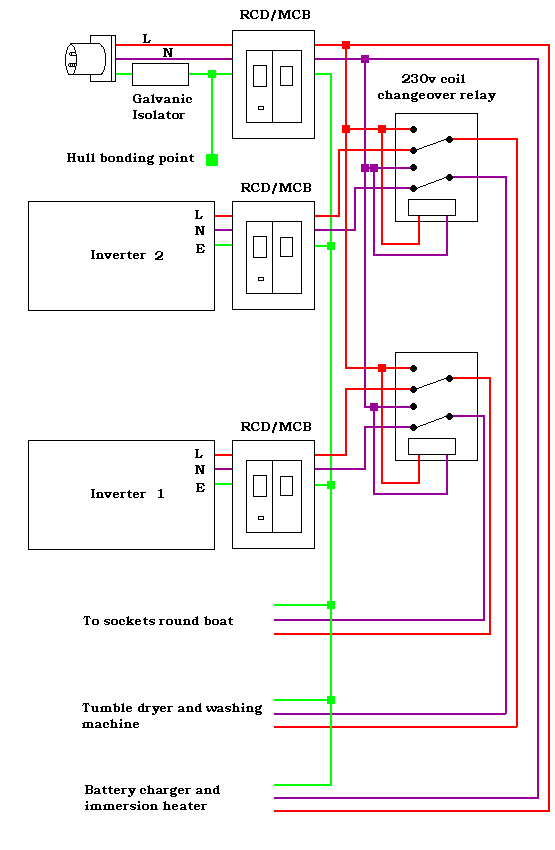
Finally here is the system as installed on Lionheart No 2
This looks complicated. In actual fact it's quite simple but a few things might be worth noting.
We often have our kids on the boat. This means things like computer games, X-Boxes, Playstations, DVD players etc. We often have 2 or more TVs on at the same time. When the kids are with us, the idea of no 230 volt electricity doesn't bear thinking about. For this reason there are 2 inverters. If one breaks, we can plug into the other one and keep the kids quiet.
As we needed 2 inverters it made sense to split the loads between them. So we have one feeding the usual sockets round the boat. The other one feeds the tumble dryer and washing machine.
As the loads are split we have quite small inverters. They are both 1500 watt, pure sinewave.
One word of warning. Do not be tempted to overcomplicate things. Try to keep it as simple as possible. Simplicity in this case is usually elegant. And an elegant design usually works better than anything else.
Page last updated 02/04/2008.
Website best viewed on a computer of some sort.