Adding a float voltage to a previousy modifed alternator.
If you have carried out the modification to the alternator as described here you may want to add a function to decrease the charge voltage back to the original charge voltage of your alternator once the batteries have been charged for some time at the higher charge voltage. This is a form of float voltage which may be much safer to maintain on the batteries for long periods of time (depending upon the battery type).
|
|
From this modification some further, very simple, modifications are possoble.
The first is simply to fit a switch in line with the newly fitted diode. When switched off, this will completely switch the alternator off and thus all charging will stop completely. Some people may consider this to be a useless modification. In actual fact, in certain installations, this feature can be very handy. Only the operator of the installation will know whether this is a useful feature.
The second modification is a little bit more complicated (still simple though) but is an incredibly useful feature to have:-
Assuming you have a SmartGauge fitted and you have carried out the modification to increase the charge voltage of the alternator, the SmartGauge high voltage alarm can be used to switch to a lower, and therefore safer, float voltage once a certain charge voltage is reached.
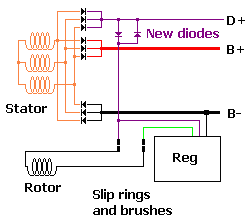
The diagram below shows the completed modification. In this diagram two additional diodes have been added. This will increase the alternator charge voltage to around 15 volts. Note the right hand diode. This, as previously, is there for supression purposes.

You will see that an additional relay has been added with the contacts connected so that they "short out" the added diodes. This will have the effect of returning the alternator to it's original charge voltage.
In turn this relay is operated via the alarm output contacts from SmartGauge.
The system should be set up as follows:-
Assume the alternator originally charged at 13.8 volts. The diodes have been added thus increasing the charge voltage to 15.0 volts.
Set the Primary Alarm on SmartGauge to operate on "Hi" voltage. Set the alarm deactivation voltage at 13.4 volts and the alarm activation voltage at 14.8 volts.
The system will now operate as follows:-
WIth low batteries the alternator will produce full charge current into the batteries. This will continue until the battery voltage rises to 14.8 volts.
Once this happens the hi voltage alarm in SmartGauge will activate. This will energise the relay and "short out" both additional diodes. This will return the alternator charge voltage to the original 13.8 volts, which is safe to maintain on the batteries indefinately.
If loads are placed on the batteries that exceed the capability of the alternator this will lower the battery voltage. If it falls as low as 13.4 volts (thus beginning to discharge the batteries), the hi voltage alarm in SmartGauge will deactivate. The battery voltage will of course remain the same.
However once the loads are removed, the battery voltage will again begin to rise back up to 14.8 volts that the hi voltage alarm is set to.
Effectively this gives a full 2 stage charge cycle that charges at a much higher voltage (to ensure rapid charging of the batteries) but then drops down to a safer float charge.
You may, of course, wish to adjust various voltage settings etc to get the best performance for your particular installation.
SmartGauge Electronics accepts no liability whatsoever for any undesired consequences of carrying out this modification. If this modification is carried out, the liability lies entirely with whoever made the modification or made the decision to carry out the modification. It is the responsibility of the person carrying out the modifications to ensure the suitability of such modifications to the installation.
Page last updated 02/04/2008.
Website best viewed on a computer of some sort.